Requirements
Before you startPrepare these items before uploading SmartQR. Having them ready makes setup much faster.
- PHP 8.3 or newer With the extensions: OpenSSL, PDO, Mbstring, Tokenizer, XML, Ctype, JSON, BCMath, and FileInfo.
-
Web server
Apache (with
mod_rewriteenabled) or Nginx. - Database MySQL 8, MariaDB 10.3+, PostgreSQL 13+, or SQLite.
-
Domain or subdomain
For example
example.comorqr.example.com. - Hosting panel access You need access to File Manager, database tools, and domain/document-root settings.
- The SmartQR ZIP file Keep it on your computer until installation is confirmed.
SmartQR is a Laravel application. Your domain must point to the
public folder inside the project, not the project root.
Upload to your server
Part 1The exact labels differ between cPanel, Plesk, and DirectAdmin, but the steps are the same on all hosts.
Create a project folder and upload the ZIP
In your hosting File Manager, create a dedicated folder for SmartQR — for example
/home/username/smartqr. Upload the SmartQR ZIP file into that folder.
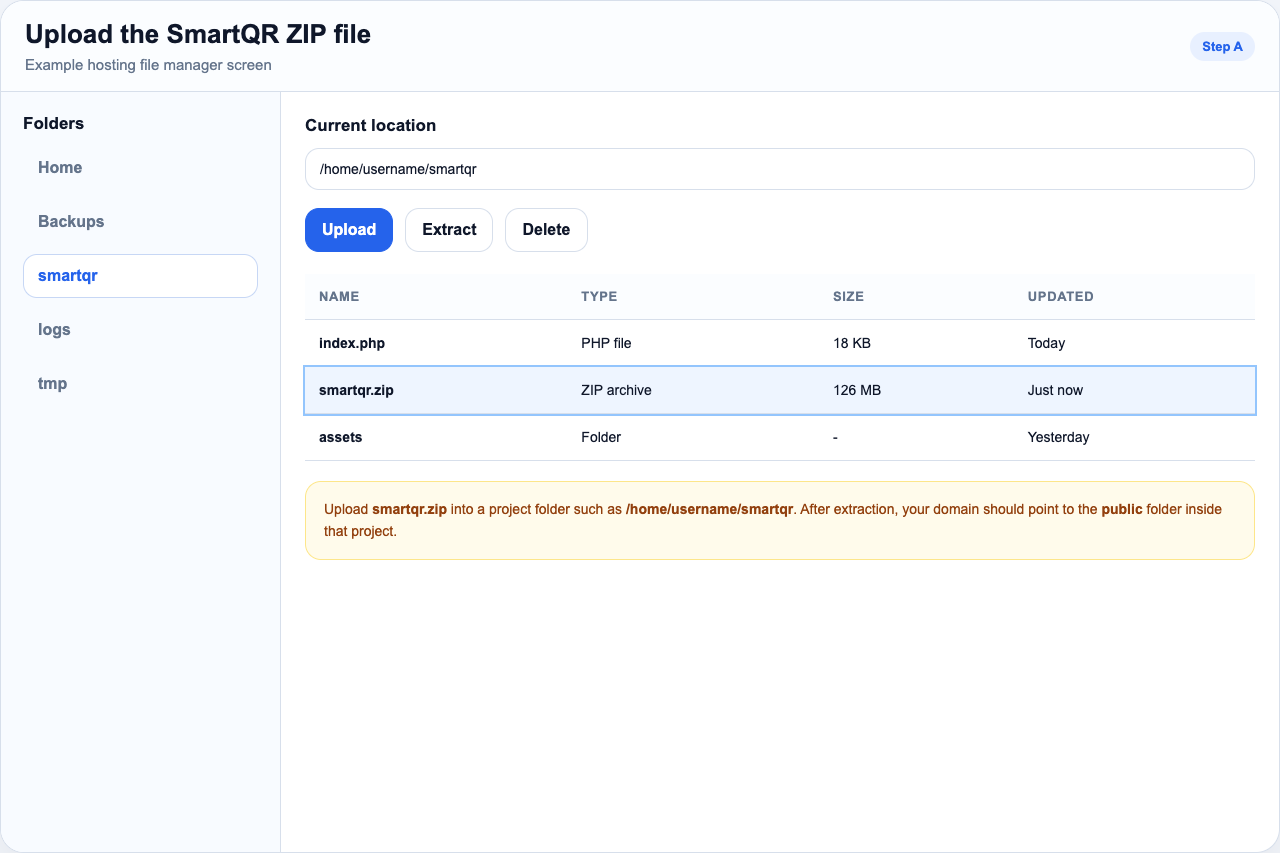
public_html. This keeps the installation clean.
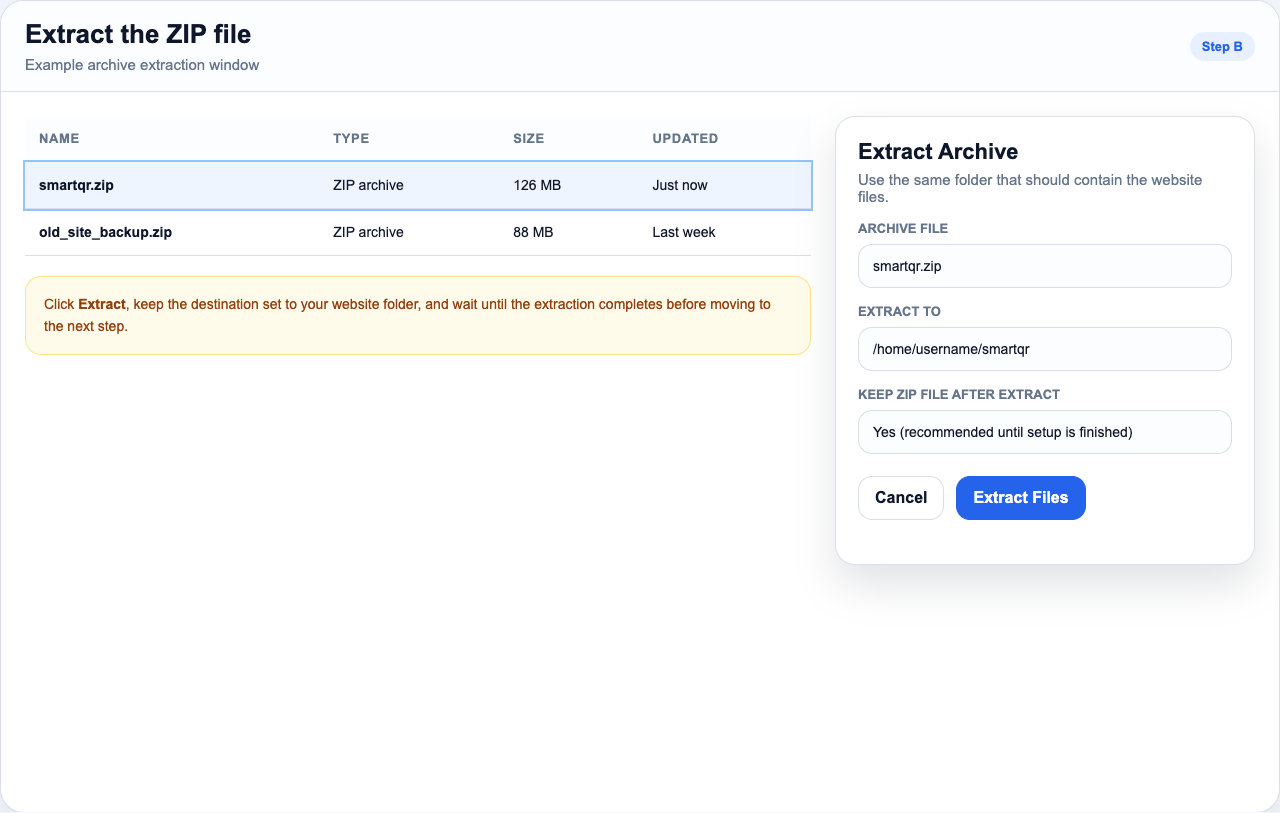
Extract the ZIP file
Select the uploaded ZIP and click Extract. Extract it into the same project folder. Wait until extraction completes.
Point your domain to public/
Part 1 — continued
After extraction, your project folder contains directories like app,
bootstrap, resources, and public. Your domain must point
to the public subdirectory.
| Setting | Value to use |
|---|---|
| Project folder | /home/username/smartqr |
| Document root / web root | /home/username/smartqr/public |
| URL in browser | https://example.com (your domain or subdomain) |
Look in your hosting panel for Domains, Addon Domains,
Manage Domain, or Document Root. If you cannot find it,
ask your hosting provider to point the domain to the SmartQR public folder.
Create a database
Part 1 — continuedCreate a new database and a database user in your hosting panel. Assign that user to the database with full permissions.
Database name
Database username
Database password
Host (usually localhost)
Port (usually 3306 for MySQL)
Copying the wrong database name or username. Many hosts automatically add a prefix like
accountname_. Use the full prefixed value exactly as your host shows it.
Run the installer
Part 2Once upload and domain setup are complete, open your domain in a browser. SmartQR may automatically install Composer dependencies first — that is normal.
On some servers the first page says Installing Composer Dependencies. Wait for it to finish and redirect automatically before continuing.
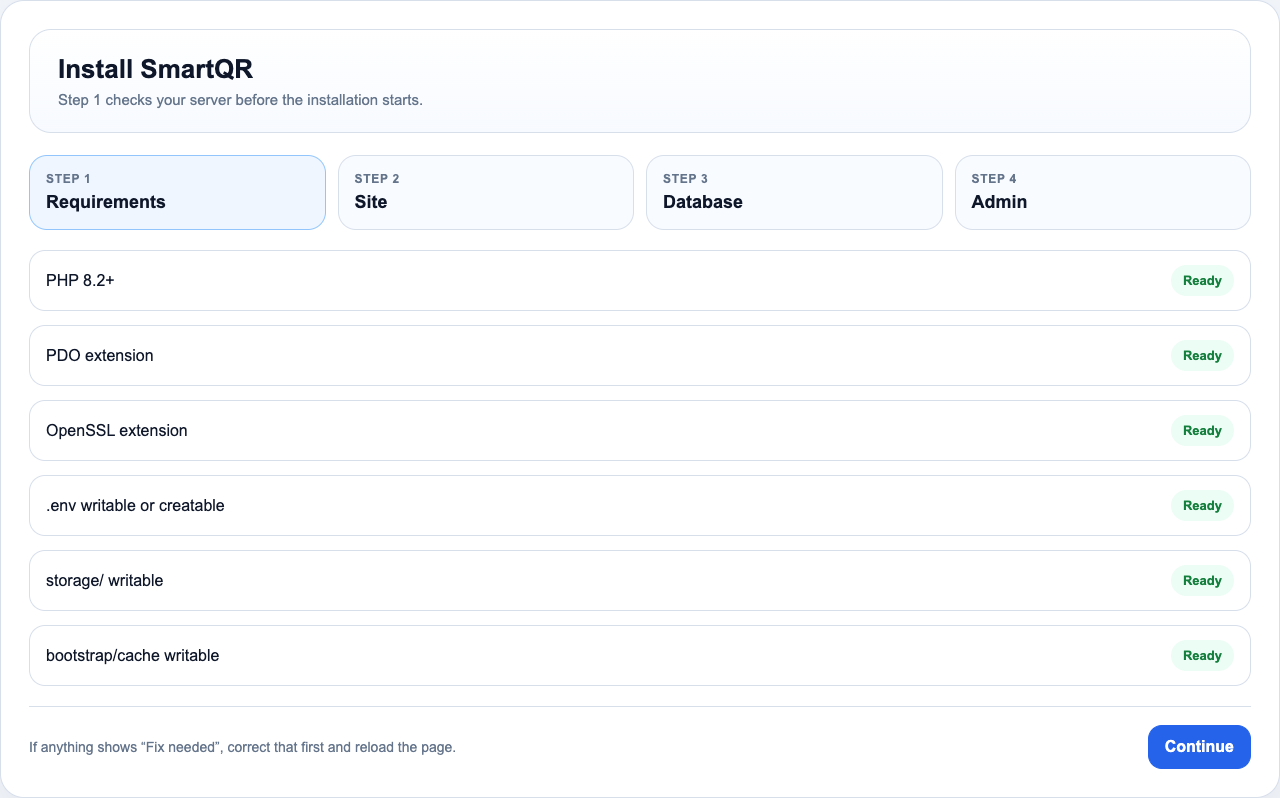
Check the requirements screen
Every item should show Ready. If you see Fix needed, resolve that item before continuing.
Enter your site details
- Site title — the name of your website or business.
- App URL — the full address, e.g.
https://example.com. No trailing slash. - Site description — a short sentence about your service. You can change it later.
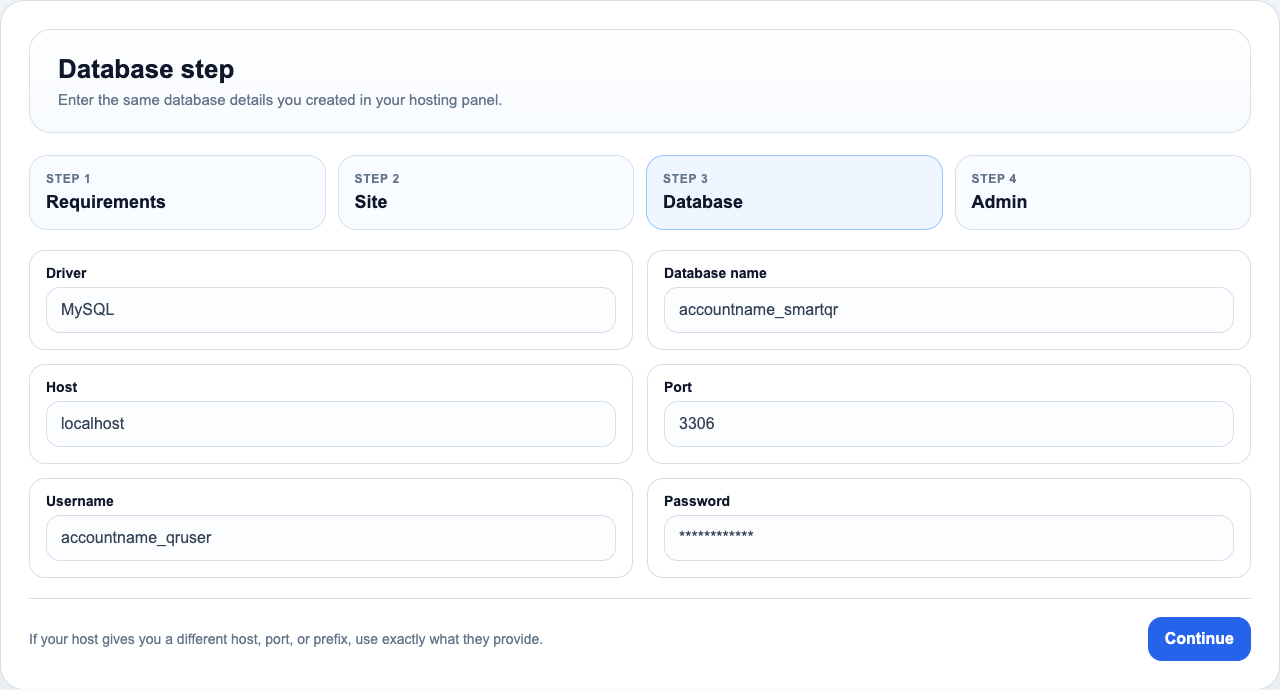
Enter your database details
Type the exact values from your hosting panel. If your host shows a prefixed database name, use the full prefixed value.
Create your admin account
This is the first account used to manage the entire platform. Save the email address and password somewhere safe.
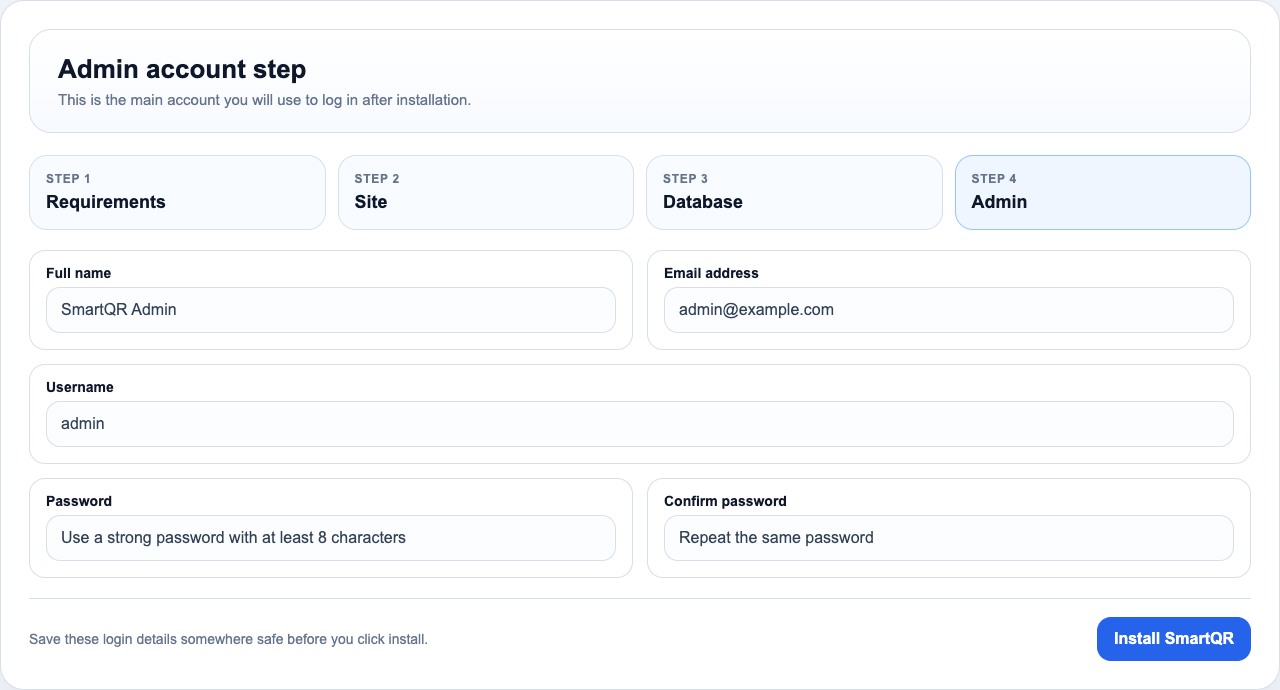
Click Install SmartQR and wait
SmartQR writes configuration, connects to the database, runs migrations, seeds starter content, creates your admin user, and activates the theme.
Read the message carefully. The most common causes are wrong database details, the wrong document root, or directories that are not writable by the web server.
After installation
Part 3SmartQR includes starter data so the dashboard is not empty. Before launching publicly, replace the starter content with your own.
Upload your logo, favicon, and brand colors in Admin → Setup → General.
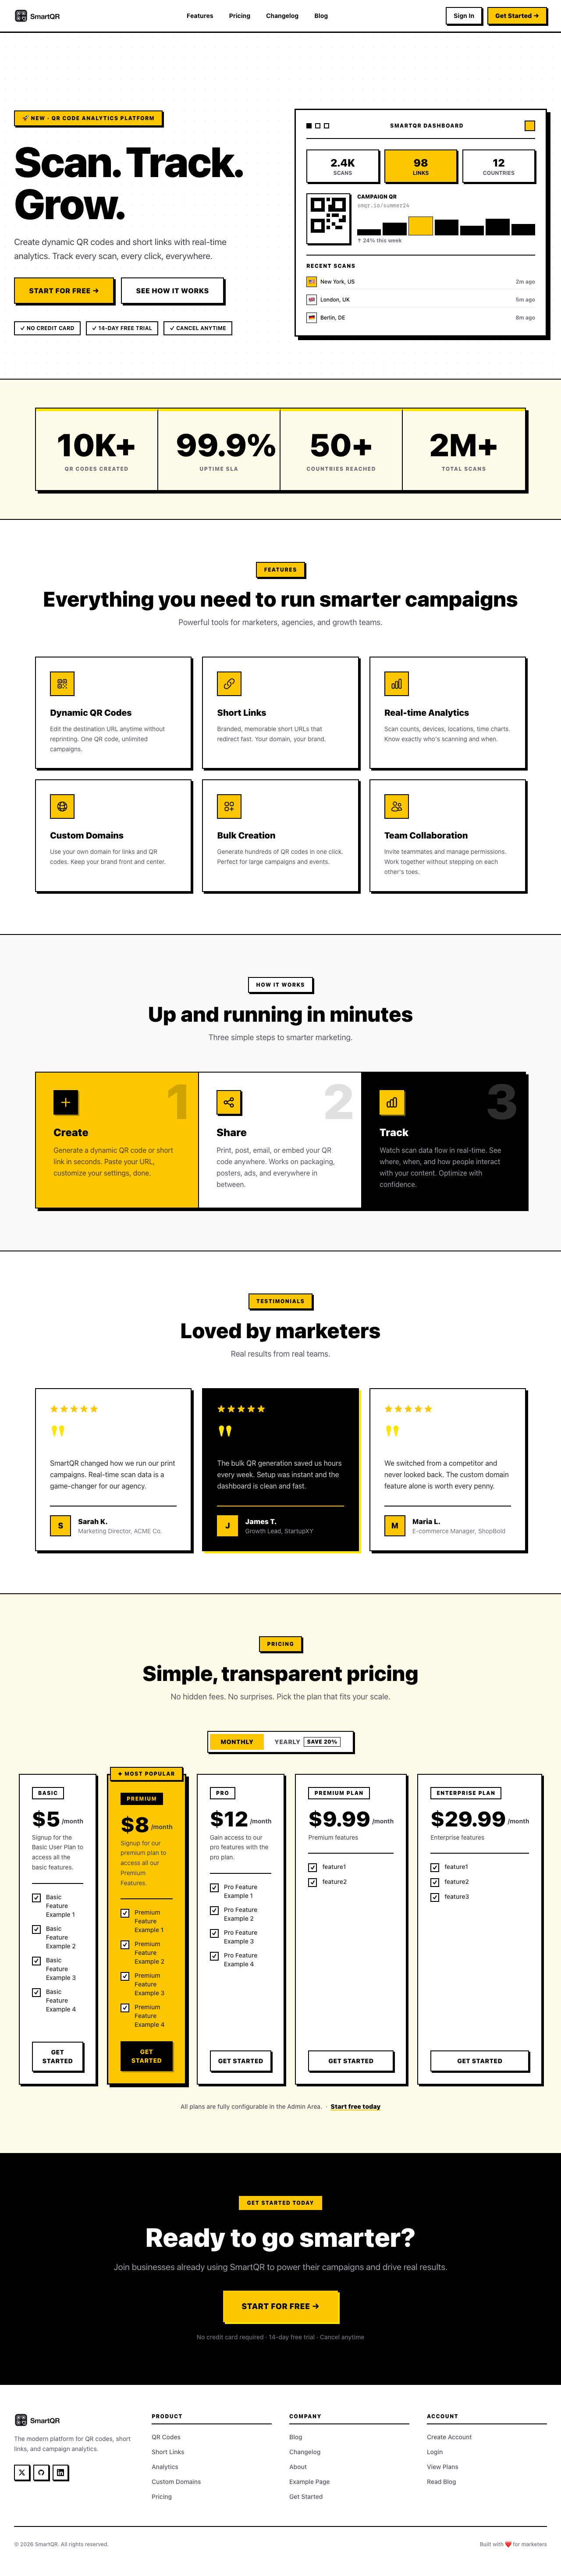
Check pricing, features, and limits so they match your business model.
Swap demo blog posts and sample pages for your own QR and marketing content.
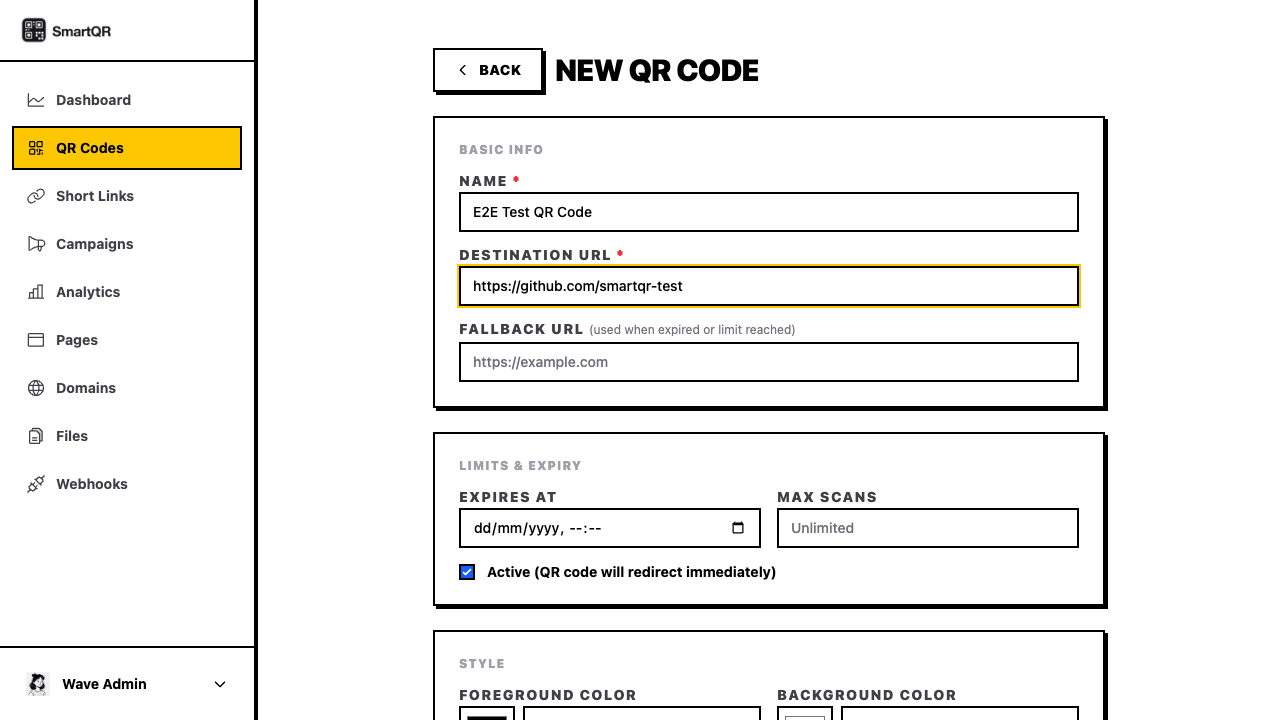
Create a test QR code and short link so you can confirm redirects and analytics work.
Admin setup overview
Part 4This section is for the platform owner. It covers the most important post-install tasks: billing configuration, plan creation, and launch preparation.
Go to Admin → Setup. This page contains the General, Billing, Landing Page, AI, and Authentication tabs.
Open the Billing tab first and choose Stripe or Paddle before filling in any credentials. The provider you choose must match the price IDs you save in your plans.
Add the Laravel scheduler cron job before launch so subscription cleanup, scheduled account deletions, and activity log cleanup continue to run automatically.
Stripe billing setup
Admin Setup — BillingIf you use Stripe, collect these three values from your Stripe dashboard and save them in Admin → Setup → Billing.
- Publishable key — from Stripe → Developers → API keys.
- Secret key — from Stripe → Developers → API keys.
- Webhook signing secret — from the Stripe webhook endpoint you create for SmartQR.
| Stripe item | What to do in SmartQR |
|---|---|
| Publishable key | Paste into the Stripe Publishable Key field in the Billing tab. |
| Secret key | Paste into the Stripe Secret Key field in the Billing tab. |
| Webhook signing secret | Paste into the Stripe Webhook Secret field after creating the endpoint below. |
In Stripe → Developers → Webhooks, create an endpoint pointing to
https://yourdomain.com/webhook/stripe. SmartQR needs subscription and checkout
events so purchases, upgrades, cancellations, and failed payments are applied automatically.
checkout.session.completed
checkout.session.expired
checkout.session.async_payment_succeeded
checkout.session.async_payment_failed
customer.subscription.updated
customer.subscription.deleted
After subscribing, customers manage billing in the Stripe customer portal. Review the portal in Stripe before launch so users can update payment methods and switch plans smoothly.
Paddle billing setup
Admin Setup — BillingIf you use Paddle, start in Sandbox mode while testing and switch to Production only when you are ready to go live.
- Seller / Vendor ID — from Paddle → Developer Tools → Authentication.
- API key — from the same Authentication area.
- Client-side token — used for the front-end checkout flow.
- Webhook secret — from the Paddle notification destination you create for SmartQR.
In Paddle → Developer Tools → Notifications, create a destination pointing to
https://yourdomain.com/webhook/paddle. Enable subscription and payment failure
events so customer access updates automatically.
subscription.created
subscription.updated
subscription.cancelled
transaction.payment_failed
In Paddle, set the default payment-management return URL to
/settings/subscription on your live domain. This returns customers to the
SmartQR billing page after managing their subscription.
Create plans and roles
Admin Setup — PlansSmartQR uses Wave plans and roles together. A plan controls billing and pricing. The linked role controls what a subscriber can access. SmartQR adds extra per-plan limits for QR-related features.
Open Admin → Plans. Add monthly, yearly, or one-time price IDs in the plan form. These IDs must come from the billing provider selected in the Billing tab.
Associated role
Monthly, yearly, or one-time price IDs
Active/default state and sort order
SmartQR limits: QR count, storage, domains, exports, webhooks
1. Create or review the user role. 2. Create or update the plan. 3. Paste the correct provider price IDs. 4. Save SmartQR plan limits. 5. Run a test purchase.
Test the billing flow
Admin Setup — TestingAlways test billing end-to-end before opening your site to the public.
- Subscribe with a test card or sandbox checkout.
- Confirm the user receives the correct plan and role.
- Confirm SmartQR feature limits match the plan.
- Test upgrading and downgrading between plans.
- Test cancellation and failed-payment behavior.
- Verify webhook events arrive successfully in your provider dashboard.
Set up the cron job
Admin Setup — ServerSmartQR uses Laravel's scheduler for recurring maintenance work. Add this cron entry on your server after installation.
Without the scheduler cron, expired subscriptions may not be cancelled on time, scheduled account deletions will not run, and old activity logs will not be cleaned up.
* * * * * cd /path/to/your/smartqr && php artisan schedule:run >> /dev/null 2>&1- Replace the path with your real SmartQR project folder, for example
/var/www/smartqr.turnsaas.com. - Run it every minute exactly as shown. Laravel decides internally which jobs run hourly or daily.
- Current scheduled tasks: expired subscription cancellation, account deletion processing, and activity log cleanup.
If you enable queued jobs, keep a queue worker running too. A queue worker does not replace the cron job, and the cron job does not replace the queue worker.
Other setup tabs
Admin SetupAfter billing and plans are configured, review the remaining tabs in Admin → Setup.
Site title, description, logo, favicon, analytics tracking ID, and documentation visibility.
Public homepage headings, pricing labels, testimonials copy, CTA text, and launch messaging.
Connect your AI provider for landing-page drafting and confirm the model choice fits your budget.
Review login/register appearance, social auth providers, and security defaults before opening registrations.
Custom domains & automatic SSL
Admin SetupSmartQR lets your users connect branded custom domains. If you run Caddy with on-demand TLS, you can also let Caddy issue SSL certificates automatically after each domain has been verified inside SmartQR.
Verify the custom domain in SmartQR first
Ask the user to add their hostname in Dashboard → Domains, point its CNAME to your SmartQR CNAME target, and click Verify. The Caddy ask endpoint only approves domains that are already stored and marked as verified in SmartQR.
Point Caddy to the public ask endpoint
Configure Caddy on your main SmartQR domain and use this ask URL:
https://your-smartqr-domain.com/domains/caddy/ask
Caddy automatically adds the requested hostname as the domain query
parameter. SmartQR responds with 200 OK only when that hostname is
a verified custom domain in your database.
Use an on-demand TLS policy in Caddy
A minimal example looks like this:
{
    on_demand_tls {
        ask https://your-smartqr-domain.com/domains/caddy/ask
    }
}

https:// {
    tls {
        on_demand
    }
}
Your final Caddyfile may include additional site blocks, reverse proxy directives, or security headers depending on how you deploy SmartQR.
Keep the normal SmartQR verify button in your onboarding process. Once the hostname shows as verified in SmartQR, the first HTTPS request through Caddy can obtain the certificate automatically.
Plugin management
Optional admin featureWhen plugin management is enabled for your installation, the Plugins page lets admins upload optional plugin ZIPs and activate them from the dashboard. Developer-level enable/disable instructions live in the project README, not in this admin guide.
Prepare the plugin ZIP
The archive should contain one plugin root only. At the top level of that root,
include exactly one main plugin file such as ExamplePlugin.php, plus
the plugin folders like src, resources, or
routes if your plugin uses them.
Upload from Admin → Plugins
Use the Upload plugin ZIP form at the top of the Plugins page. After a successful upload, the plugin appears in the list below and can be activated when you are ready.
Activate optional plugins
Uploaded plugins are not forced on automatically. Activate them from the list to add them to the installed plugin set. Required plugins are always loaded and are intentionally hidden from this page.
Do not upload a ZIP that tries to replace a required plugin such as core or
smartqr. The admin uploader blocks replacing required plugins.
Updates
Admin SetupSmartQR includes an admin update flow for verifying your purchase code, checking the latest release, downloading the update package from your remote server, and running the final migration tasks.
Open Admin → Updates and verify your purchase code
Paste your Envato purchase code into the License verification form and click Verify license. SmartQR stores the verified license status for future update checks.
Check the latest release
Click Check for updates to read the latest version metadata from your update server. If a newer release is available, SmartQR shows the remote version and release notes on the page.
Download and apply the update
Use Download and apply update to fetch the latest versioned remote
package such as smartqr-update-v1.0.1.zip, extract it, copy the updated
files over the current installation, and run the update tasks automatically.
Run update migrations if the dashboard shows a notice
When the file version is newer than the recorded installed version, SmartQR displays a dashboard notice card. Click Run update migrations to finish database migrations, clear caches, and record the new installed version.
If you update the files manually from an update ZIP, log into the admin panel afterwards and run the update action from Admin → Updates or the dashboard notice so database changes and caches are finalized properly.
Create QR codes
Daily UsageGo to QR Codes in the dashboard, click Create, choose the QR type, enter the destination, and save.
Create short links
Daily UsageOpen Short Links, add the destination URL, and optionally set a custom slug so the link is easy to share.
- Name — optional label for the dashboard.
- Destination URL — the page visitors should reach.
- Custom slug — optional. If left empty, SmartQR generates a random short slug.
Build landing pages
Daily UsageOpen Landing Pages to create a promotional, event, product, or link-in-bio page. Use the visual editor to add sections, buttons, images, and content blocks.
Track analytics
Daily UsageOpen Analytics to see which QR codes and short links are performing best. Use this to measure campaigns and decide what to improve.
Use campaigns
Daily UsageCampaigns let you group related QR codes, short links, landing pages, and reports together — for example, one campaign for a restaurant menu, another for an event, and another for a product launch.
Go-live checklist
Reference- Check the App URL — make sure it matches the real domain visitors will use.
- Test a QR code on a phone — confirm the redirect works and analytics count increases.
- Review branding — logo, colors, site title, and descriptions all replaced.
- Verify billing and limits — provider, webhook, plans, roles, and feature limits match what you are selling.
- Remove demo content — replace demo blog posts, sample pages, and placeholder text.
- Keep a backup — download a backup of files and database once everything is working.
Troubleshooting
ReferenceCheck that your domain points to the public folder, not the project root.
Re-check the database host, name, username, password, and port in the installer.
Ask your host to make storage/, bootstrap/cache/, and the
.env file writable by the web server.
Your server may not have Composer or enough permissions. Ask your host to run
composer install in the project root.
Credits & third-party
ReferenceMain software and libraries used in this SmartQR installation.
- Laravel — the main PHP application framework.
- Filament — the admin panel framework.
- Livewire — reactive server-driven UI components.
- Wave by DevDojo — the SaaS starter foundation SmartQR is built on.
- Tailwind CSS — utility-first styling for the frontend and admin UI.
- Alpine.js — lightweight frontend interactions.
- GrapesJS — the landing page builder/editor.
- Stripe — supported billing provider.
- Paddle — supported billing provider.